
Showing posts with label weekly report. Show all posts
Showing posts with label weekly report. Show all posts
Boca Bearings Workshop Weekly Update 15
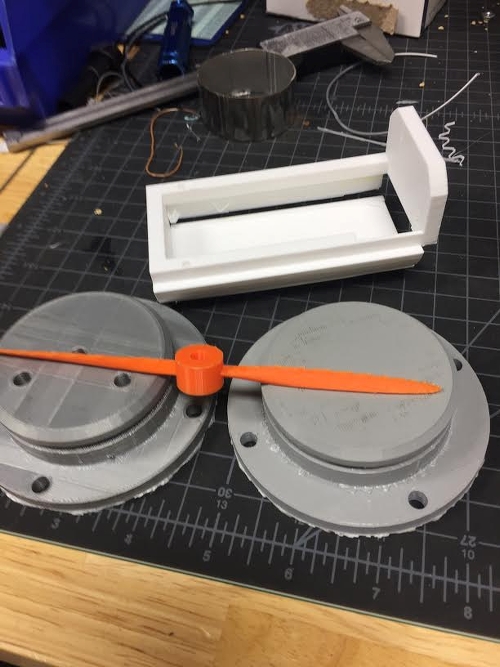
Not much was done on my personal project this week because the group go kart took priority. However, the first half of the hull was printed and glued together with hub. More components were ordered so the pressure vessel and rods can start being assembled and machined. I printed the hull in safety orange, so you can see it clearly in the water.


Boca Bearings Workshop Weekly Update 14
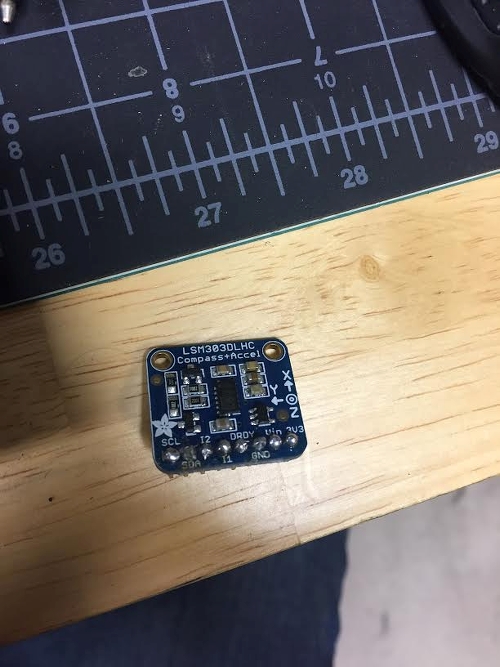
Some final adjustments were made to the hull of the sub. Using Solid works the hull was thickened for strength and and holes were added for the fin rods and mounting plate that hold the two halves of the shell together. The Arduino Uno, battery, and motor holder were 3D printed along with the propeller and end caps for the pressure vessel. The LSM303DLHC compass arrived and the pins were soldered on. Now code can be written and tested for finding the heading and speed.
Boca Bearings Workshop Weekly Update 13

This week I worked on the 3D model for my personal project. The pressure vessel at the center of the design is based from the dimensions of the Arduino Uno microcontroller. The groove in the end caps for the O-ring seals was dimensioned around the #144 O-ring see the parker O-ring manual for more detail. To get the U brackets and fins to turn DC moors with 270 rpm will be hooked up from the pressure vessel and connected with a series of rods and universal joints. The rods in the universal joint will be threaded and when the dc motor spins the u bracket will rise or lower on the rod and pivoted about the fin rods. The universal joints compensate for this pivoted so that the U brackets have a full range of motion of 15 degrees. To seal the rods and stop eater from getting into the pressure vessel 6mm rotary seals are placed into the end cap with the shafts running through it. The drive shaft with the propeller also goes through bearings once they leave the pressure vessel as well as in the back hub. This allows for support of the shafts as well has keeping the rods turning. The Hub was 3D printed and Fins are on the printer.
Boca Bearings Workshop Weekly Update 12
It has been some time since we have updated you all, but we have been working on a number of projects lately. So, the first project that I will be discussing is the Power Wheels project car. Structurally, the Power Wheels car is ready for its first test drive. I finished welding the steering column more into place so that it was more linear with the chassis. I also welded the bracket for the steering wheel onto the shaft of the steering column.


Boca Bearings Workshop Weekly Update 11
Hello all! Over the past few weeks I’ve printed out several different iterations of the design and tested their mechanics until I got to a point that I’m comfortable saying that the first version of the design is complete. I know there will most likely need to be some minor edits to this but it’s close enough to work as a good starting point for anyone who would like to get started on their own. I am linking a google drive folder that contains all the parts to download ad play with.
https://drive.google.com/drive/folders/1lHCO_vAFfgywqYFIWytexU1MGKUKrvrW?usp=sharing
https://drive.google.com/drive/folders/1lHCO_vAFfgywqYFIWytexU1MGKUKrvrW?usp=sharing
Boca Bearings Workshop Weekly Update 10
The Powerwheels car is close to its first test run! So since the last update I have managed to remount/relocate the motor to a different position so that it would be easier to get the chain on and off. With that being said, we now finally have a mounted chain with the correct tension. We used the standard T8F chain. The gas pedal (throttle) was also mounted to the front of the chassis and that is held in place with two 4” bolts with adjusting nuts on the bottom and nylon lock nuts on top for adjustability.
The brake pedal was also installed. This was rather interesting as I used leftover materials to assemble the brake. I started off by notching the frame a little in the area that I wanted the pedal to be at. I notched it for the purpose of giving physical support to two 608 bearings. I then put a threaded rod into the two bearings so that it can swivel freely. I then proceeded to cut two pieces of steel that are about 2.5” long each and drilled two holes into each piece. One hole on the bottom for the threaded rod and another hole for the support bolt. The support bolt also has 3 spacers on it to provide a good contact surface between the plates. So the idea now is to just have a link go from the pedal to the master cylinder for the brake, and that will be accomplished by using two ball-joints.
Boca Bearings Workshop Weekly Update 9
The Power Wheels car has deserved a long over due update. Lately I have been busy working on it every chance that I get. From the last update, I’m pretty sure that the frame was not complete, or it was close to being complete. Well, the frame is completely done in terms of being structurally strong. I welded the rest of the seams that needed to be done. I grinded and sanded down the weld spots too.
After about a month of wait time I finally received the rear sprocket for our chain drive system. All I did was drill holes into the flywheel and put washers in between the flywheel and sprocket so I can space it out enough for the chain to go on.
After about a month of wait time I finally received the rear sprocket for our chain drive system. All I did was drill holes into the flywheel and put washers in between the flywheel and sprocket so I can space it out enough for the chain to go on.
Boca Bearings Workshop Weekly Update 8
This past week I have been trying to catch up on the schedule of the Power wheels car. I started off by attempting to finish the structural design of the steering column on the frame. I picked out 0.5inch round hollow tube metal and a steel pipe that I would fit bearings into for the steering shaft. I began to cut and weld the pieces into place. The process was going smoothly, until Andrew began to look for a bearing that would fit the steering shaft and the inside diameter of the steel pipe that I already welded on.
Boca Bearings Workshop Weekly Update 7
After doing some research I recently discovered that AutoDesk offers their Fusion 360 CAD program for free to hobbyists. So I have decided to switch to Fusion 360 from SolidWorks in the hopes that in doing so other people can more easily recreate, modify, or otherwise explore 3D models that get made in The Workshop. If you are interested in downloading and getting started follow this guide:
https://knowledge.autodesk.com/support/fusion-360/learn-explore/caas/sfdcarticles/sfdcarticles/How-to-activate-start-up-or-educational-licensing-for-Fusion-360.html
https://knowledge.autodesk.com/support/fusion-360/learn-explore/caas/sfdcarticles/sfdcarticles/How-to-activate-start-up-or-educational-licensing-for-Fusion-360.html
Boca Bearings Workshop Weekly Update 6
Our old Powerwheels chassis has taken a beating over the past two years now. With that being said, the team decided to create a new chassis and retire the old one. The layout of the new frame is a rather simple design, yet it is structurally sound enough to get the job done. The rear end of the old frame will still be used in our newer since it seemed to be the only part of the old chassis that was not bent or structurally defected.
Boca Bearings Workshop Weekly Update 5
The first new project I’ll be talking after Maker Faire Orlando is a sorting machine. The goal will be to sort skittles (or any uniformly shaped and colored candy) into separate cups. The project is heavily based on the fantastic work done by Willem Pennings on his blog which you can find here: https://willemm.nl/mm-skittles-sorting-machine/. There have been other sorting machines similar to this, but I think Willem’s looks the best and so that is the design I’ll be drawing from the most. Over the last week I’ve put together a parts list and begun to CAD the mechanical aspects of the project. Below you’ll find a link to my list of components and the cost so if you would also like to make one you have a good starting point. Once I finish modeling the system I’ll make the files available so that anyone can reproduce the project as well.
Boca Bearings Workshop Weekly Update 4
The last few weeks I have been busy refurnishing the bike for the RC car project as well as designing 2 versions of the chassis for the car itself.


Boca Bearings Workshop Weekly Update 3
RC Airboat
I finally “finished” the airboat. I finished making the last of the rudder design so with that part being finished I decided to do the boats first test run. Prior to me making the different designs and modifications to the hull of the boat. I never actually put the boat or the hull of it in the water for a “sink or float” test. To help with the buoyancy of the hull I added an epoxy resin to the bottom of the hull, but again I still never tested it out.
Boca Bearings Workshop Weekly Update 2
Pi-Zero Drone:
This week I made the silicate elastomer mixture of cornstarch and silicon I* to make tires for the drone. I didn't expect the mixing of the ingredients to be as messy as it was, but the finished product turned out to be a great success. The drone now has good traction on slippery concrete. The only down side to the new tires is that the shape of one of them is a tad lumpy which occasionally alters the direction of the bot. I should be able to fix that by shaving off some material.
Boca Bearings Workshop Weekly Update 1
Weather Vane
I finally have the rpm counter/wind speed monitor working for the weather vane. The next step in this process is to finish building a sturdier base for the weather vane, to enable it to be properly planted. Once I get the structure of the weather vane down, I will then test it outside with the electronics to test two things:
Subscribe to:
Posts (Atom)